
Hello Kitty has been a beloved character for decades, and her iconic image makes for the perfect cake design for birthdays, parties, and special occasions. Whether you’re a seasoned baker or a beginner, this guide will walk you through everything you need to know to create a Hello Kitty cake that will impress your guests. From baking the perfect cake base to mastering fondant decorations, we’ve got you covered. Let’s dive in!
Why Make a Hello Kitty Cake?
A Hello Kitty cake is more than just a dessert—it’s a statement. Here’s why you should consider making one:
Personalization
A Hello Kitty cake can be tailored to suit any occasion, from birthdays to baby showers. You can customize the colors, decorations, and even the flavors to match the theme of your event.
Creativity
Decorating a Hello Kitty cake allows you to showcase your artistic skills. Whether you’re using fondant, buttercream, or edible decorations, the process is a fun and creative outlet.
Universal Appeal
Both kids and adults adore Hello Kitty, making it a crowd-pleaser. Whether you’re hosting a children’s birthday party or a themed adult gathering, a Hello Kitty cake is sure to be a hit.
Types of Hello Kitty Cakes
There are countless ways to design a Hello Kitty cake. Here are some popular options:
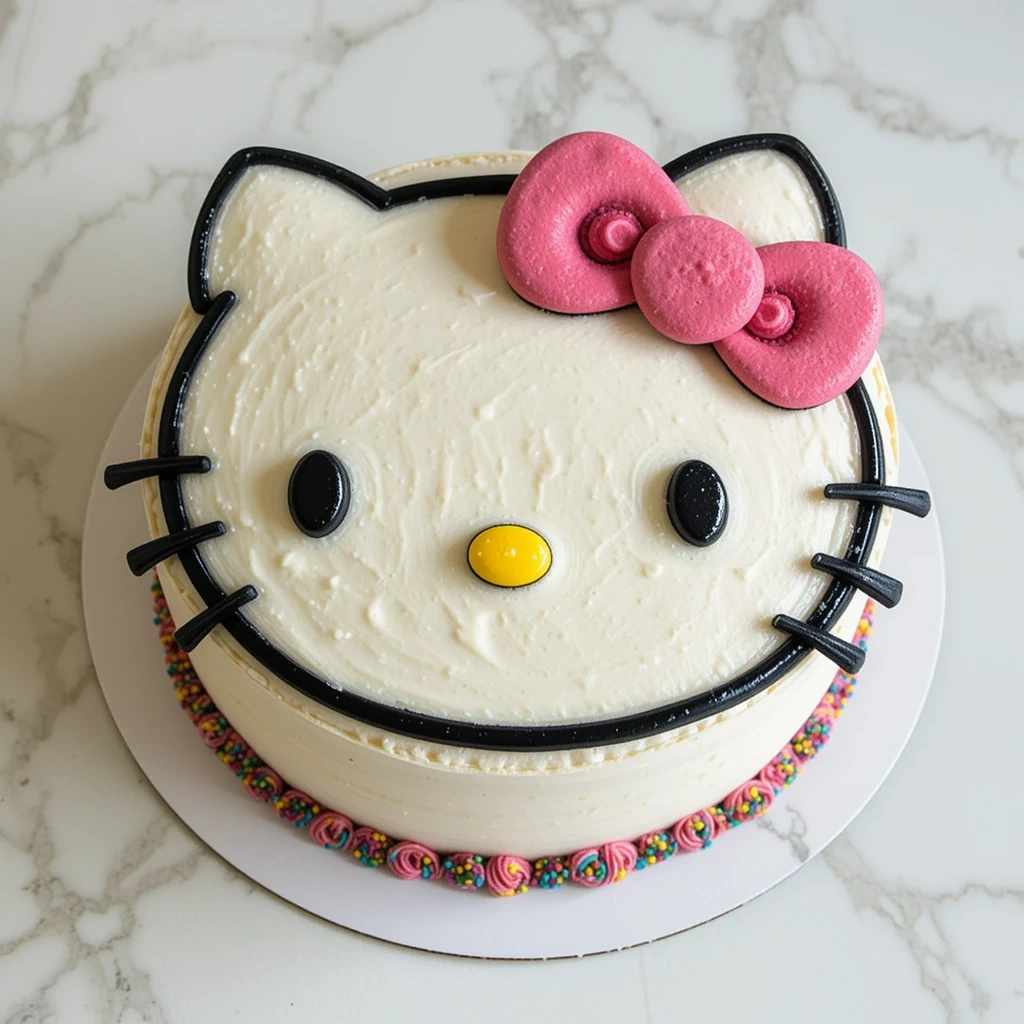
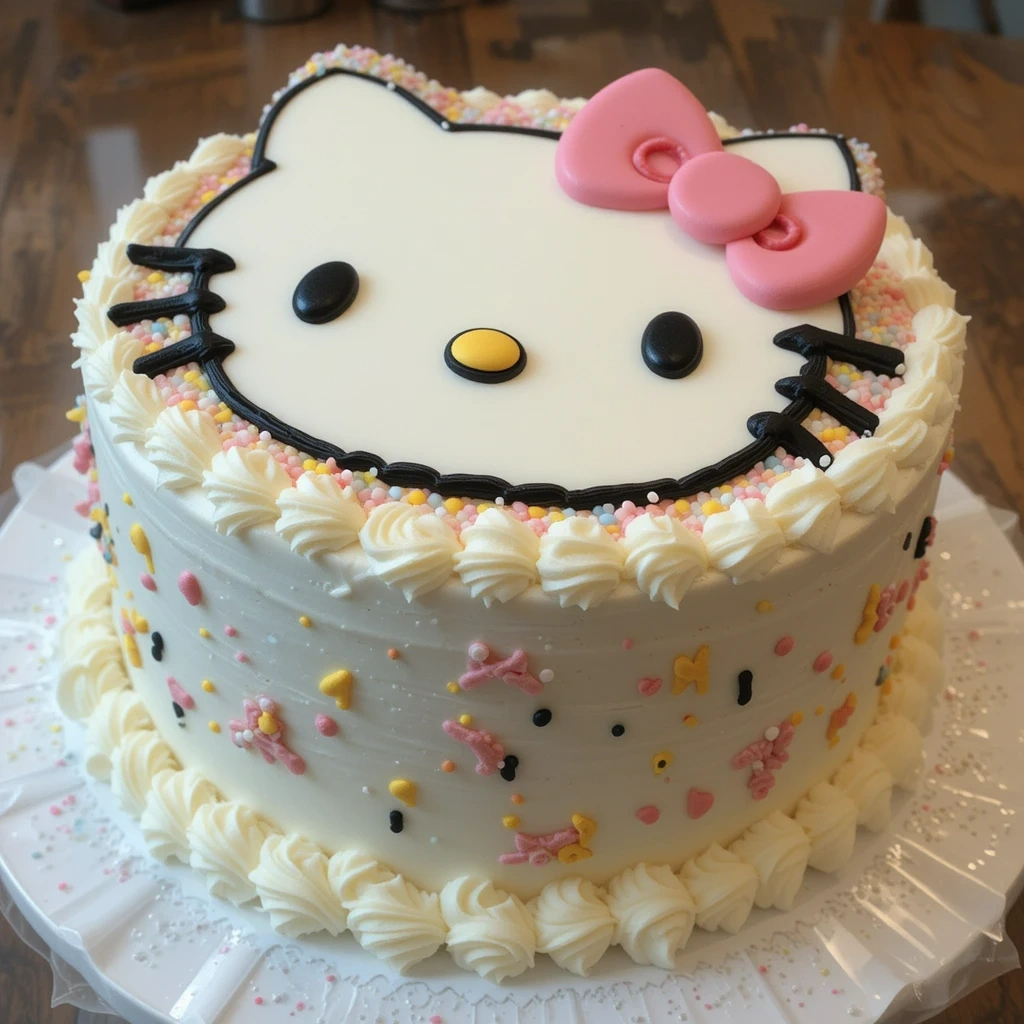
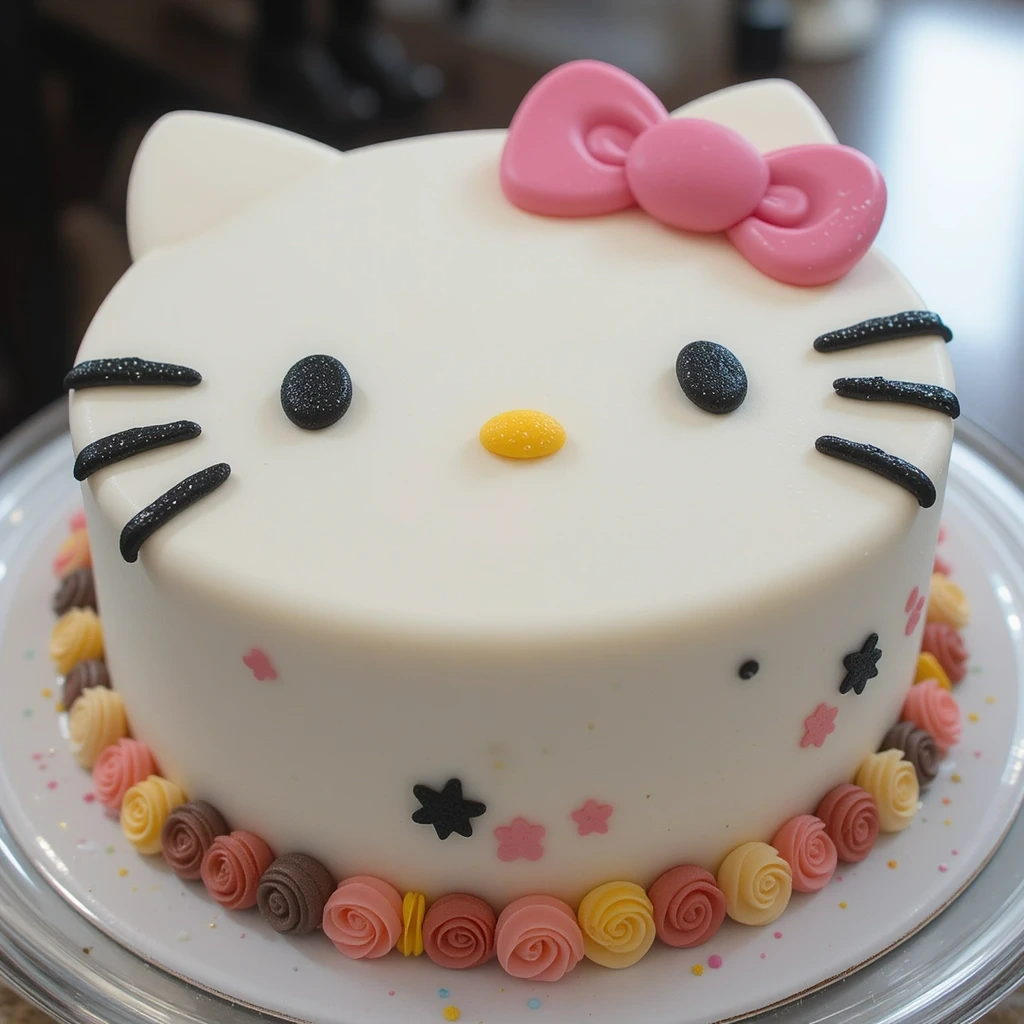
Classic Hello Kitty Face Cake
A simple yet iconic design featuring Hello Kitty’s face. This design is perfect for beginners and can be made using fondant or buttercream.
3D Hello Kitty Cake
A show-stopping cake that brings Hello Kitty to life in three dimensions. This design is more advanced and requires some cake sculpting skills.
Cupcakes and Cake Pops
Perfect for parties, these mini treats are easy to make and decorate. You can create a variety of Hello Kitty faces and expressions.
Bundt Cake
A unique twist on the traditional Hello Kitty cake. Use a bundt pan to create a ring-shaped cake and decorate it with Hello Kitty’s face and bow.
Ice Cream Cake
A refreshing option for summer celebrations. Layer ice cream with cake and decorate with Hello Kitty’s iconic features.
For more ideas, visit this Carvel Ice Cream Cake.
Hello Kitty Cake Recipe: A Step-by-Step Guide
Ingredients
For the Cake Base:
- 2 ½ cups (315g) all-purpose flour
- 2 ½ tsp baking powder
- ½ tsp salt
- 1 cup (225g) unsalted butter, softened
- 2 cups (400g) granulated sugar
- 4 large eggs
- 1 tbsp vanilla extract
- 1 cup (240ml) whole milk
For the Frosting:
- 1 ½ cups (340g) unsalted butter, softened
- 4 cups (500g) powdered sugar
- 2-3 tbsp milk or heavy cream
- 1 tsp vanilla extract
- Food coloring (pink, black, yellow)
For Decorations:
- 1 lb (450g) white fondant
- ¼ lb (115g) black fondant
- ¼ lb (115g) pink fondant
- ¼ lb (115g) yellow fondant
- Edible glitter or sprinkles (optional)
- Hello Kitty cake toppers (optional)
Tools You’ll Need
- Round or shaped cake pans (8-inch or 9-inch)
- Piping bags and tips (round and star tips)
- Fondant tools (rolling pin, smoother, shaping tools)
- Offset spatula
- Cake turntable
- Cake leveler or serrated knife
- Edible markers (for fine details)
- Mixing bowls and electric mixer
Instruction
1. Baking the Cake Base
- Preheat the Oven: Preheat your oven to 350°F (175°C). Grease and flour your cake pans to prevent sticking.
- Prepare the Batter: In a medium bowl, whisk together the flour, baking powder, and salt. In a separate large bowl, beat the softened butter and sugar until light and fluffy. Add the eggs one at a time, mixing well after each addition. Stir in the vanilla extract.
- Combine Wet and Dry Ingredients: Gradually add the dry ingredients to the butter mixture, alternating with the milk. Mix until just combined—do not overmix.
- Bake the Cake: Pour the batter evenly into the prepared pans. Bake for 25-30 minutes, or until a toothpick inserted into the center comes out clean.
- Cool the Cakes: Let the cakes cool in the pans for 10 minutes, then transfer them to a wire rack to cool completely.
2. Making the Frosting
- Beat the Butter: In a large bowl, beat the softened butter until creamy and smooth.
- Add Sugar and Flavor: Gradually add the powdered sugar, one cup at a time, mixing on low speed to avoid a mess. Once incorporated, add the vanilla extract and 2-3 tablespoons of milk or cream to achieve a smooth, spreadable consistency.
- Color the Frosting: Divide the frosting into portions and tint them with food coloring. You’ll need pink for the bow, black for the eyes and whiskers, and yellow for the nose.
3. Assembling the Cake
- Level the Cakes: Use a cake leveler or serrated knife to trim the tops of the cakes so they are even.
- Apply the Crumb Coat: Place one cake layer on a turntable or serving plate. Spread a thin layer of frosting on top, then add the second layer. Cover the entire cake with a thin coat of frosting (crumb coat) to seal in crumbs. Chill the cake in the refrigerator for 15-20 minutes.
- Frost the Cake: Apply a final, thicker layer of frosting to the chilled cake, using an offset spatula to create a smooth surface.
4. Decorating the Cake
- Cover with Fondant: Roll out the white fondant to about ¼-inch thickness. Carefully drape it over the cake and smooth it with a fondant smoother. Trim any excess fondant from the base.
- Create Hello Kitty’s Face: Use black fondant to shape the eyes and whiskers. Roll small pieces of yellow fondant for the nose. For the bow, shape pink fondant into two teardrop shapes and a small rectangle, then assemble them on the cake.
- Add Final Details: Use edible markers or piped frosting to add fine details like eyelashes or whisker dots. Sprinkle edible glitter or sprinkles for extra sparkle if desired.
Tips for Success
- Chill the Cake: Chilling the cake before applying fondant or final decorations makes it easier to handle.
- Work Quickly with Fondant: Fondant can dry out, so work efficiently and keep unused portions covered.
- Practice Piping: If you’re new to piping, practice on parchment paper before decorating the cake.
Decorating the Hello Kitty Cake
1. Using Fondant
- Roll out white fondant and cover the cake smoothly.
- Use black fondant to create Hello Kitty’s eyes and whiskers.
- Shape pink fondant into her iconic bow.
2. Piping Techniques
- Use a small round tip to pipe details like the nose and eyelashes.
- Add texture to the bow with a star tip.
3. Adding Edible Decorations
- Sprinkle edible glitter or pearls for a touch of sparkle.
- Use pre-made Hello Kitty toppers for a quick and easy finish.
Advanced Tips for Perfect Hello Kitty Cakes
Avoid Common Mistakes
- Ensure your fondant is rolled evenly to prevent cracks.
- Chill your cake before applying fondant to make it easier to handle.
- Use a crumb coat to keep crumbs from mixing into your final frosting layer.
Smooth Fondant
- Use a fondant smoother for a professional finish.
- Apply a thin layer of shortening to your hands and tools to prevent fondant from sticking.
Time-Saving Hacks
- Use pre-colored fondant to save time.
- Prepare decorations in advance and store them in an airtight container.
Variations of Hello Kitty Cakes
Gluten-Free and Vegan Options
- Substitute flour with gluten-free flour blends.
- Use plant-based alternatives for eggs, butter, and milk.
Mini Cakes
- Perfect for individual servings and great for parties.
- Use small cake molds and decorate each mini cake with Hello Kitty’s face.
Seasonal Designs
- Add festive elements for holidays like Christmas or Halloween.
- Use seasonal colors and decorations to match the theme.
FAQs About Hello Kitty Cakes
1. How do I make a Hello Kitty cake without fondant?
If you’re not comfortable working with fondant or simply prefer not to use it, buttercream frosting is a fantastic alternative. You can pipe Hello Kitty’s face, bow, and whiskers directly onto the cake using different piping tips. For the eyes and nose, use a small round tip, and for the bow, a star tip can add texture. You can also use edible markers or food-safe pens to draw details like whiskers and eyelashes. This method is beginner-friendly and still yields an adorable result.
2. Can I use a boxed cake mix?
Absolutely! A boxed cake mix is a great time-saver and works perfectly for the cake base. To elevate the flavor, consider adding extra ingredients like vanilla extract, almond extract, or even a bit of citrus zest. You can also substitute milk for water or use melted butter instead of oil to make the cake richer. Boxed mixes are versatile and reliable, making them a great choice for both beginners and experienced bakers.
3. How long does it take to decorate a Hello Kitty cake?
The time required to decorate a Hello Kitty cake depends on the complexity of the design. A simple buttercream design might take 1-2 hours, while a more intricate fondant-covered cake could take 2-3 hours or more. To save time, prepare decorations like fondant shapes or buttercream accents in advance. Chilling the cake before decorating can also make the process smoother and faster.
4. Where can I buy Hello Kitty cake toppers?
Hello Kitty cake toppers are widely available online through retailers like Amazon, Etsy, and specialty baking stores. You can also check local party supply stores or bakeries that carry licensed Hello Kitty products. Look for edible toppers made from fondant or wafer paper for a seamless finish. If you’re feeling creative, you can even make your own toppers using fondant or printable edible images.
5. What are the best colors for a Hello Kitty cake?
Hello Kitty’s classic color palette includes white, pink, black, and yellow. These colors are perfect for capturing her iconic look. However, you can also incorporate pastel shades like mint green, lavender, or baby blue for a unique twist. For themed parties, consider matching the cake colors to the event’s overall decor. Just remember to keep Hello Kitty’s face and bow recognizable by sticking to her traditional colors for those elements.
6. How do I make a 3D Hello Kitty cake?
A 3D Hello Kitty cake is a show-stopping centerpiece but requires some advanced techniques. You can use a shaped cake pan specifically designed for Hello Kitty, or carve the cake into her silhouette by hand. Layer cake pieces to create depth, and use dowels or straws for support. Cover the cake with fondant or buttercream, and add details like the bow, eyes, and whiskers. For a more realistic look, consider using edible food coloring sprays or airbrushing techniques.
Conclusion
Creating a Hello Kitty cake is a fun and rewarding project that’s perfect for any occasion. With the right tools, ingredients, and a bit of creativity, you can make a cake that’s as adorable as it is delicious. Don’t forget to share your creations on social media and tag Recipes Briny for a chance to be featured!