
The vintage heart cake holds a special place in my heart, not just for its romantic charm and delicate design, but because it brings me back to one of my most treasured memories with my grandmother. I was a little girl peeking over the edge of her kitchen counter, mesmerized by the way she could turn butter, sugar, and flour into something magical. One Valentine’s Day, she decided we’d make something “extra special”—a heart-shaped cake layered with love and laced with old-world charm. It wasn’t just about baking; it was about creating something beautiful together, piping delicate rosettes and looping vintage-style borders with care and laughter.
That cake became a tradition—one we returned to every year, each time adding our own little twist while holding on to the romantic, nostalgic essence that made it so memorable. It was more than dessert; it was a symbol of love, creativity, and the power of shared moments in the kitchen.
In this article, I’ll walk you through the history and artistry of the vintage heart cake—from its origins steeped in tradition to modern ways you can bring it to life. I’ll share the baking process step-by-step, techniques for achieving that classic ornate finish, and ideas to inspire your own elegant creation. Whether you’re making it for someone special or simply treating yourself, this cake is sure to become a cherished part of your story—just as it became a part of mine.
Check more Cakes as Carrot Dome Cake
Table of Contents
Table of Contents
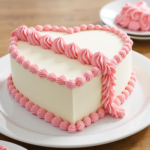
Vintage heart cake
Description
The vintage heart cake holds a special place in my heart, not just for its romantic charm and delicate design, but because it brings me back to one of my most treasured memories with my grandmother.
Ingredients
Ingredients and Tools
- 2 ½ cups (310g) all-purpose flour
- 2 ½ tsp baking powder
- ½ tsp baking soda
- ½ tsp salt
- ¾ cup (170g) unsalted butter, room temp
- 1 ¾ cups (350g) granulated sugar
- 4 large eggs, room temp
- 1 tbsp pure vanilla extract
- 1 cup (240ml) whole milk, room temp
- ¼ cup (60ml) sour cream or plain yogurt
Tools Required
- Serrated knife and angled spatula: For shaping the cake and applying frosting.
- Piping bags and tips: Wilton 4B, 32, and 102 are ideal for creating ruffles, lace patterns, and floral designs.
- Cake drum or cardboard base: Provides stability and makes decorating easier.
- Icing smoother: Helps achieve a polished, professional finish.
Instructions
Step-by-Step Guide
Step 1: Bake the Cake
-
- Preheat oven to 350°F (175°C). Grease and line two 8-inch round cake pans.
-
- In a medium bowl, sift together flour, baking powder, baking soda, and salt.
-
- In a large bowl, cream butter and sugar until light and fluffy (about 3–4 mins).
-
- Add eggs one at a time, beating well after each. Mix in vanilla.
-
- Whisk milk and sour cream together in a separate bowl.
-
- Alternate adding the dry ingredients and milk mixture to the butter mixture. Begin and end with the dry mix.
-
- Divide batter evenly between pans. Bake for 28–32 mins or until a toothpick comes out clean.
-
- Cool in pans for 10 mins, then transfer to wire racks to cool completely.
Step 2: Make the Buttercream
-
- Beat butter until creamy and pale (about 3–4 mins).
-
- Gradually add sifted powdered sugar.
-
- Mix in vanilla, salt, and cream one tablespoon at a time until smooth and spreadable.
-
- Divide into 3 bowls for coloring:
-
- Bold Pink: 2 drops Fuchsia + 2 drops Deep Pink
-
- Medium Pink: 2 drops Deep Pink
-
- Light Pink: Leave as is or add 1 drop Deep Pink
-
- Divide into 3 bowls for coloring:
Step 3: Shape the Heart
-
- Place one cooled cake on a flat surface.
-
- Cut out two top corners in a curved shape and reattach them to the top center to form a heart.
-
- Repeat with second layer.
Step 4: Assemble & Crumb Coat
-
- Place bottom layer on a cake board.
-
- Spread a generous layer of buttercream.
-
- Add second layer, align the heart shape.
-
- Apply a thin crumb coat over entire cake.
-
- Chill in fridge for 30 mins to set.
Step 5: Final Coat & Chill
-
- Apply a thicker, final layer of buttercream and smooth with a spatula or icing smoother.
-
- Chill again for at least 20 minutes before piping.
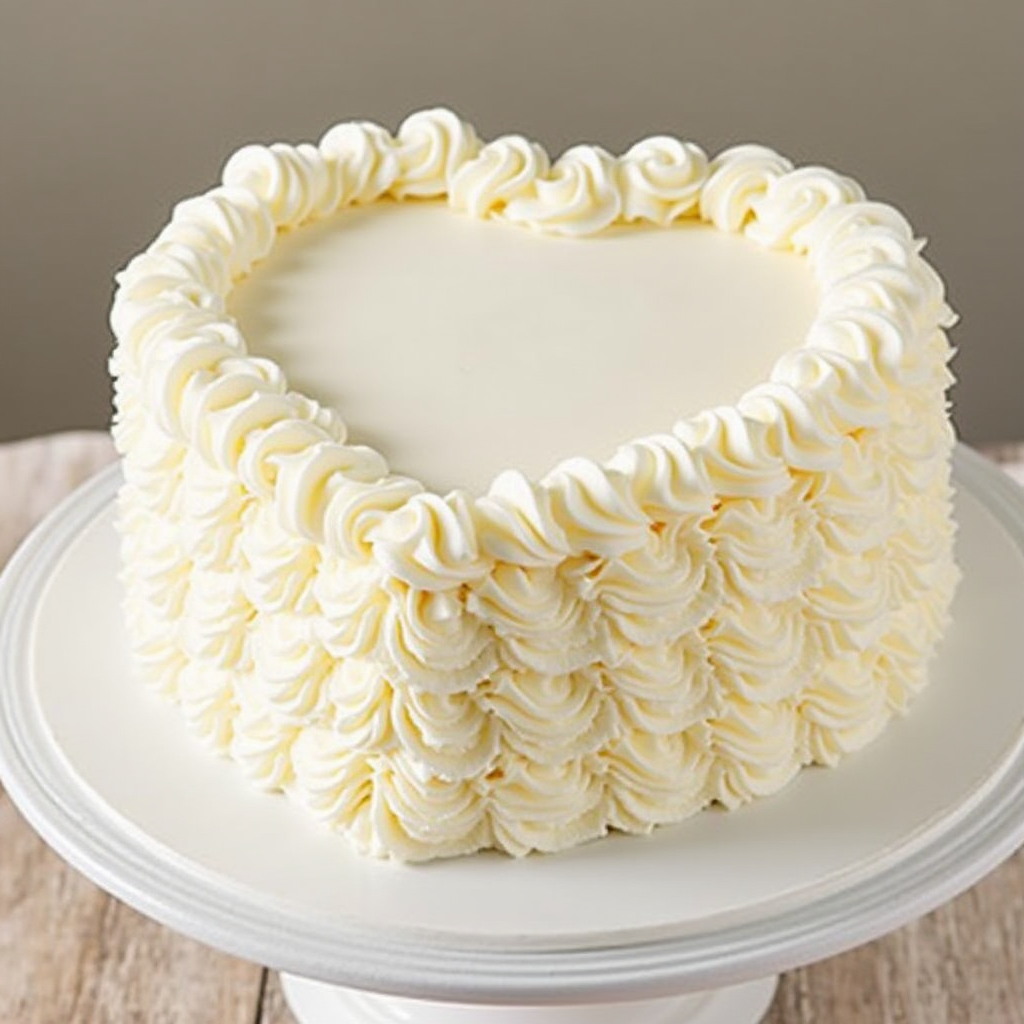
Step 6: Piping & Decoration
-
- Use:
-
- 4B tip + bold pink: large shell borders (top & bottom edges)
-
- 32 tip + light pink: smaller shell border inside the bold border
-
- 102 tip + medium pink: ruffled garlands on sides
-
- 3 tip + medium pink: your personalized message or small details
-
- Use:
-
- Decorate with pearls, sprinkles, or edible decorations if desired.
A Brief History of the Vintage Heart Cake
The heart-shaped cake has long symbolized love and celebration. Its roots trace back to medieval European feasting traditions, where ornate pastries graced royal banquets and wedding feasts. Over time, the heart shape became closely associated with romance, and bakers began crafting cakes adorned with intricate piping and floral accents.
Baking the Perfect Heart-Shaped Cake
Creating a vintage heart cake starts with a solid foundation. Begin by selecting a reliable recipe for a moist and flavorful cake. Popular choices include vanilla, chocolate, or red velvet, as their rich flavors pair well with the cake’s decorative elements. To achieve the heart shape, you can use a heart-shaped cake pan or bake two round cakes and cut them into a heart shape by trimming the edges and assembling the pieces.
Once baked, allow the cake to cool completely before leveling and layering it with your preferred filling, such as buttercream, fruit preserves, or ganache. A crumb coat—a thin layer of frosting—will help seal in any loose crumbs and create a smooth surface for decorating.
The Appeal of Vintage Heart Cakes
A Romantic Nostalgia
The vintage heart cake brings back the elegance of retro designs with intricate piping, pastel hues, and delicate lettering. This trend has seen a resurgence thanks to its popularity on platforms like Instagram, where bakers showcase stunning creations that look as good as they taste.
For a modern twist on baking, you might enjoy experimenting with this Dinosaur Cake tutorial, perfect for themed events.
Occasions That Call for a Vintage Heart Cake
This versatile cake suits many events:
- Romantic Celebrations: Valentine’s Day, engagements, and anniversaries.
- Family Gatherings: Birthdays, Mother’s Day, and baby showers.
- Themed Parties: Retro or vintage-inspired celebrations.
Looking to add even more flair to your dessert table? Check out our creative Graduation Cake Ideas for celebrating milestones with sweet treats.
How to Make a Vintage Heart Cake
Ingredients and Tools
- 2 ½ cups (310g) all-purpose flour
- 2 ½ tsp baking powder
- ½ tsp baking soda
- ½ tsp salt
- ¾ cup (170g) unsalted butter, room temp
- 1 ¾ cups (350g) granulated sugar
- 4 large eggs, room temp
- 1 tbsp pure vanilla extract
- 1 cup (240ml) whole milk, room temp
- ¼ cup (60ml) sour cream or plain yogurt
Tools Required
- Serrated knife and angled spatula: For shaping the cake and applying frosting.
- Piping bags and tips: Wilton 4B, 32, and 102 are ideal for creating ruffles, lace patterns, and floral designs.
- Cake drum or cardboard base: Provides stability and makes decorating easier.
- Icing smoother: Helps achieve a polished, professional finish.
Step-by-Step Guide
Step 1: Bake the Cake
- Preheat oven to 350°F (175°C). Grease and line two 8-inch round cake pans.
- In a medium bowl, sift together flour, baking powder, baking soda, and salt.
- In a large bowl, cream butter and sugar until light and fluffy (about 3–4 mins).
- Add eggs one at a time, beating well after each. Mix in vanilla.
- Whisk milk and sour cream together in a separate bowl.
- Alternate adding the dry ingredients and milk mixture to the butter mixture. Begin and end with the dry mix.
- Divide batter evenly between pans. Bake for 28–32 mins or until a toothpick comes out clean.
- Cool in pans for 10 mins, then transfer to wire racks to cool completely.
Step 2: Make the Buttercream
- Beat butter until creamy and pale (about 3–4 mins).
- Gradually add sifted powdered sugar.
- Mix in vanilla, salt, and cream one tablespoon at a time until smooth and spreadable.
- Divide into 3 bowls for coloring:
- Bold Pink: 2 drops Fuchsia + 2 drops Deep Pink
- Medium Pink: 2 drops Deep Pink
- Light Pink: Leave as is or add 1 drop Deep Pink
Step 3: Shape the Heart
- Place one cooled cake on a flat surface.
- Cut out two top corners in a curved shape and reattach them to the top center to form a heart.
- Repeat with second layer.
Step 4: Assemble & Crumb Coat
- Place bottom layer on a cake board.
- Spread a generous layer of buttercream.
- Add second layer, align the heart shape.
- Apply a thin crumb coat over entire cake.
- Chill in fridge for 30 mins to set.
Step 5: Final Coat & Chill
- Apply a thicker, final layer of buttercream and smooth with a spatula or icing smoother.
- Chill again for at least 20 minutes before piping.
Step 6: Piping & Decoration
- Use:
- 4B tip + bold pink: large shell borders (top & bottom edges)
- 32 tip + light pink: smaller shell border inside the bold border
- 102 tip + medium pink: ruffled garlands on sides
- 3 tip + medium pink: your personalized message or small details
- Decorate with pearls, sprinkles, or edible decorations if desired.
For added elegance, consider embellishing the cake with edible pearls, gold leaf, or sugar flowers. Arrange these details strategically to enhance the vintage aesthetic.
Decorating Your Vintage Heart Cake
Piping Techniques and Buttercream Consistency
- Medium-Consistency Buttercream: Ensure your buttercream holds its shape but is easy to pipe for intricate designs.
- Layered Shades: Use gradient pinks or pastels for a romantic vintage effect.
For inspiration on enhancing your decorating skills, try this Brookie Cookie Recipe, which features decadent layers and creative toppings.
Classic Design Elements
- Shell Borders: Use Wilton Tip 4B for bold edges.
- Double Ruffle Garlands: Add depth with Tip 102.
- Delicate Accents: Incorporate Tip 32 for small borders or heart shapes.
Enhance your design further with edible glitter, metallic sprinkles, or fondant flowers.
Flavors and Variations
Classic Flavors
- Chocolate: Rich and indulgent.
- Vanilla: A versatile classic.
- Red Velvet: Perfect for romantic occasions.
Creative Twists
- Strawberry Cream: Fruity and sweet.
- Lemon Zest: Refreshing for springtime events.
- Cookies and Cream: A fun, crowd-pleasing choice.
Pair your cake with complementary treats like Strawberry Cheesecake Cookies for a delightful dessert spread.
Final Tips for Success
- Work in Layers: Chill the cake between each step to ensure the frosting stays firm and easy to work with.
- Practice Piping: If you’re new to piping, practice your designs on parchment paper before applying them to the cake.
- Stay Inspired: Look to vintage lace patterns, floral arrangements, or even antique fabrics for design inspiration.
FAQs About Vintage Heart Cake
- How Do I Make a Heart Cake Without a Pan?
Creating a heart-shaped cake without a specialized pan is easier than you might think. Start by baking one round cake and one square cake. Once cooled, cut the round cake in half to form the two top curves of the heart. Place the square cake on a serving tray, positioning it diagonally to create the bottom point of the heart. Attach the two semicircles to the top edges of the square cake, and voilà—you have a heart-shaped cake! Trim any uneven edges for a polished look. - What’s the Best Buttercream for Piping?
For intricate piping designs, a medium-consistency buttercream is ideal. American buttercream, made with butter, powdered sugar, vanilla extract, and a splash of milk, is a popular choice. It’s easy to work with and holds its shape well. If the buttercream is too thick, add a bit more milk; if it’s too thin, incorporate more powdered sugar until you achieve the perfect texture for piping. - Can It Be Made Gluten-Free or Vegan?
Absolutely! To make a gluten-free vintage heart cake, substitute regular flour with almond flour or a gluten-free flour blend. For a vegan version, replace butter with plant-based alternatives like coconut oil or vegan margarine, and use flax eggs or applesauce instead of eggs. Ensure all other ingredients, such as food coloring and sprinkles, are also vegan-friendly. - How Long Does It Take to Make a Vintage Heart Cake?
From baking to decorating, expect the process to take around 3–4 hours. This includes baking and cooling the cakes, preparing the buttercream, assembling the heart shape, and adding decorative piping and embellishments. Planning ahead and allowing enough time for each step ensures a stress-free baking experience. - How Do I Store a Vintage Heart Cake?
To keep your cake fresh, store it in an airtight container in the refrigerator for up to 3 days. Before serving, let it sit at room temperature for about 30 minutes to soften the buttercream and enhance the flavors. If you need to store it longer, consider freezing the cake (without decorations) and thawing it in the fridge overnight before decorating.
With these tips, you’re ready to create a stunning vintage heart cake that’s as delicious as it is beautiful!
Conclusion
A vintage heart cake is the perfect blend of art and flavor, making it a memorable centerpiece for any celebration. With the right techniques and tools, you can craft a dessert that’s as stunning as it is delicious.
For more inspiration, explore our collection of Graduation Cakes or pair your masterpiece with savory dishes like Garlic Parmesan Chicken Pasta Bake for a complete celebration menu.